Saturday, September 2, 2017

Mini Clubdoor Fix


The Mini Clubdoor is a cool thing :) Some of the first mini's had problems with faulty routing of the wire, and it caused the wire to get stuck, and sometimes the door switch to break in cold weather.


My dooor got stuck last winter, and I first checked the door switch. This is a mechanical lever that operates the main door lock by wire.

The door switch problem

Pry off the cover and have a look


The Spring (1) should be in the slot (2). In the cold winter the wire got stuck since it is routed wrong. the switch was broken and cant pull the wire to open the lock when the door is open.


The Solution

I went to the dealer and got a new switch, It came with the wire and was not expensive. Less than 30 Euro.


How To

1. Undo the  screw at the top cover. Torx 20


2. Pry off the cover with your fingers. It will come straight out from the door and its just snapped in place by clips.


3. Unplug the light wire inside the cover. Make a note of how the cable its routed so you get it back as it should be.


4. Just slide the cover down the seat belt and let it rest on the floor.


5. Now take off the bolt at the top of the door panel. Torx 20.


6. The last bolt is inside this hole at the back of the door panel. Torx 25.


7. Remove the ring around the door handle. Use fingers only and pull it carefully straight out from the door.


8. Pry the door panel strainght out from the door. Use your fingers and be gentle. Its just plastic clip mounts and they don't need much force. Easy does it.. Make a not of how the cables are routed so you can put them back in the right place.


9. The cables are clipped in place several places. Pull straight out and try not to destroy the clip. Unplug and put the panel away.


10. Remove the seat belt mount screws and move away the bracket. Torx 50.


11. Carefully pry away the dust protection cover. Its glued with some elastic "goo" and can be removed and replaced if careful.


12. Remove the 4 screws at the door switch. Torx 20


13. Remove the 4 screws at the Top door lock. Torx 20. At the back of the lock, remove the wire that goes down to the door switch. 


14. My cable was routed wrong (a), so when reassembling I put it in the round hole (b). This was installed wrong at the factory on the early models.


Now you just need to reassemble it all. This is a one hour job that anyone can do. The only thing I had to fiddle a little with was to insert the wire and get it routed, but I only used my fingers so its not to difficult. Just put it in from the switch side and route it back to the door lock.

Good luck :)


Friday, September 2, 2016

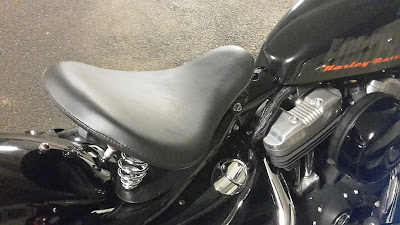
Spring Seat On Sportster 48


I built my own spring seat bracket from 1,5 mm steel plate. 

1. Remove the original seat and remove the rear (1) and the front bolt (2). The rear bolt can be accessed from under the fender and it normallly comes off so easy that you just use your fingers. Its a 1/2 inch (13 mm keywidth) under and a torx on top.


2. Add a rear bolt of your choice (3), and reinsert the front bolt (4). Don't thighten anything yet. Now you have confirmed that everything is ready for the seat.


3. Next step is to mount the seat on the bracket, before it goes on the motorcycle. This can be a little tricky. Patience and a girlfriend with small fingers is the key. Start with setting the springs to the seat, then you mount the front to the bracket as you want it, and finally screw the springs to the bracket.


- For this LaRosa seat I could use the standard front bracket that came with the seat


4. Then its just mounting the bracket to the seat again.  As you see I used the standard seat lock bolt at the back. If I paint it black its ok to keep it i think. Nice to use when i strap stuff at my rear fender.


For me, I am 77 kilo, the springs are to hard. I will change them to scisssor springs. Scissor springs will aso fit this seat better and i can lower the front, and move it back a little. 


Sunday, June 19, 2016

Flathead Beauty

I wish i'd kept all my motorcycles through the years..


What a beauty


 Surprised by winter


 A sleep by the road

Sunday, June 1, 2014

Sportster Baker XL6 transmission


Harley transmissions are noisy and unprecise. Sledgehammer engineering... I installed a Baker when my old transmission was totally worn out after 30 000 km. That's not an impressive life length. This is my everyday bike I use for basic transport in the city and I need it to be rock solid, also when I go to the next city by the highway.

Driving the Baker XL6 makes me wonder, why can't Harley make a decent transmission when other 3'rd party suppliers can do ?  Its precise, silent and have a trap door that doesn't break.

Riding at 110-130 km / h is comfortable and in a good vibration range. I love it, but mostly because its so precise when shifting,

The procedure is quite simple, tear out the old one, refit the 5'th countershaft gear from your old transmission on to the Baker, do a little elbow grease to modify the housing and the pawl latch. Took me 5 hours from start to finish with just normal hand tools on the garage floor. Easy peasy. Just follow the Baker instructions attached with the transmission.

Out with the old one and prepping the space for teh 6'th gear with the template bolted on :

No need to say but, make sure you cover up and clean out thorougly afterwards

I used a cheap tool like this to grind away the material for the 6'th gear. Just a lot of elbow grease..make sure you grind away enough, or you will hear it when you hit the 6'th grear. Follow the template and go at least 25 mm deep from the outside of the template. Again, follow the Baker instructions.


My precious, oiled and ready to go in..


The cave are prepped, cleaned, oiled and ready to recieve..


Its a tight fit..


After that you need to modify the shifter pawl arm a little...Just grind away a little so the two points don't collides when shifting into gear. Just follow the instructions..


When finished it looks so good its a shame to put on the cover :) Before assembling, dont forget the spacers to move the clutch basket and the magneto out a little.. Use the Harley workshop manual to adjust the gear pawl..you will need a 3 mm drill bit..


I don't want so much bling on my bike, but I did an exeption for the baker clutch cover..My shoe tends to grind away the black paint on the original cover so this looks better..


 mm

Friday, May 30, 2014

Sportster tank risers

The maximum length before you need to also raise the rear end of the tank is 50 mm on a 2002 sportster. I used 50 mm and its just right. I had to modify my La Pera saddle to fit. I bent the front and used a hot glue gun to refit the upholstry. This is how i got them made at MekMagnussen


Use a low head socked head bolt and fit the brackets to the tank first on the inside with the head on the inside. Then lower the tank and bolt it on to the original hole with the original bolt. To do this you have to loosen the rear bolts in order to lift the tank enough to fit the brackets.

This is the study, and later I have painted the brackets and put dome nuts on to make it look better.


It gives quite a change in the appearance of the bike. Not easy to see, but if you know the bike you will see something's changed. I like the look with the elevated tank. When i put on the dragbar it will look great.


This is the before picture..Look at the gap between the seat and the tank, also the angle on the tank.